Your first job, start to paid, this week

Three steps to get set up, then one job carried the whole way through: quote, approval, schedule, crew, invoice, payment. Every screen below is the real product.

Create accountSee every feature
Getting set up

Three steps before the first job

Setup is deliberately small. The product is meant to prove itself on real work, not on a configuration weekend.

A worker in a teal hard hat and dark work jacket, seen from behind, holding a phone to his ear on a city jobsite, with a white pickup, traffic cones, barricades and scaffolding behind him.
Step 01

Create your account

Company name, logo, your own login. That is the whole setup — there is no implementation call to book and no consultant to schedule before you can use it.

A man drafting a building elevation in pen on a large sheet of paper at a dark wooden table, with a wooden rule and a rolled drawing beside him.
Step 02

Bring your work across

Add the clients and properties you are actively working with, invite the crew by email, and connect the calendar and payment accounts you already use.

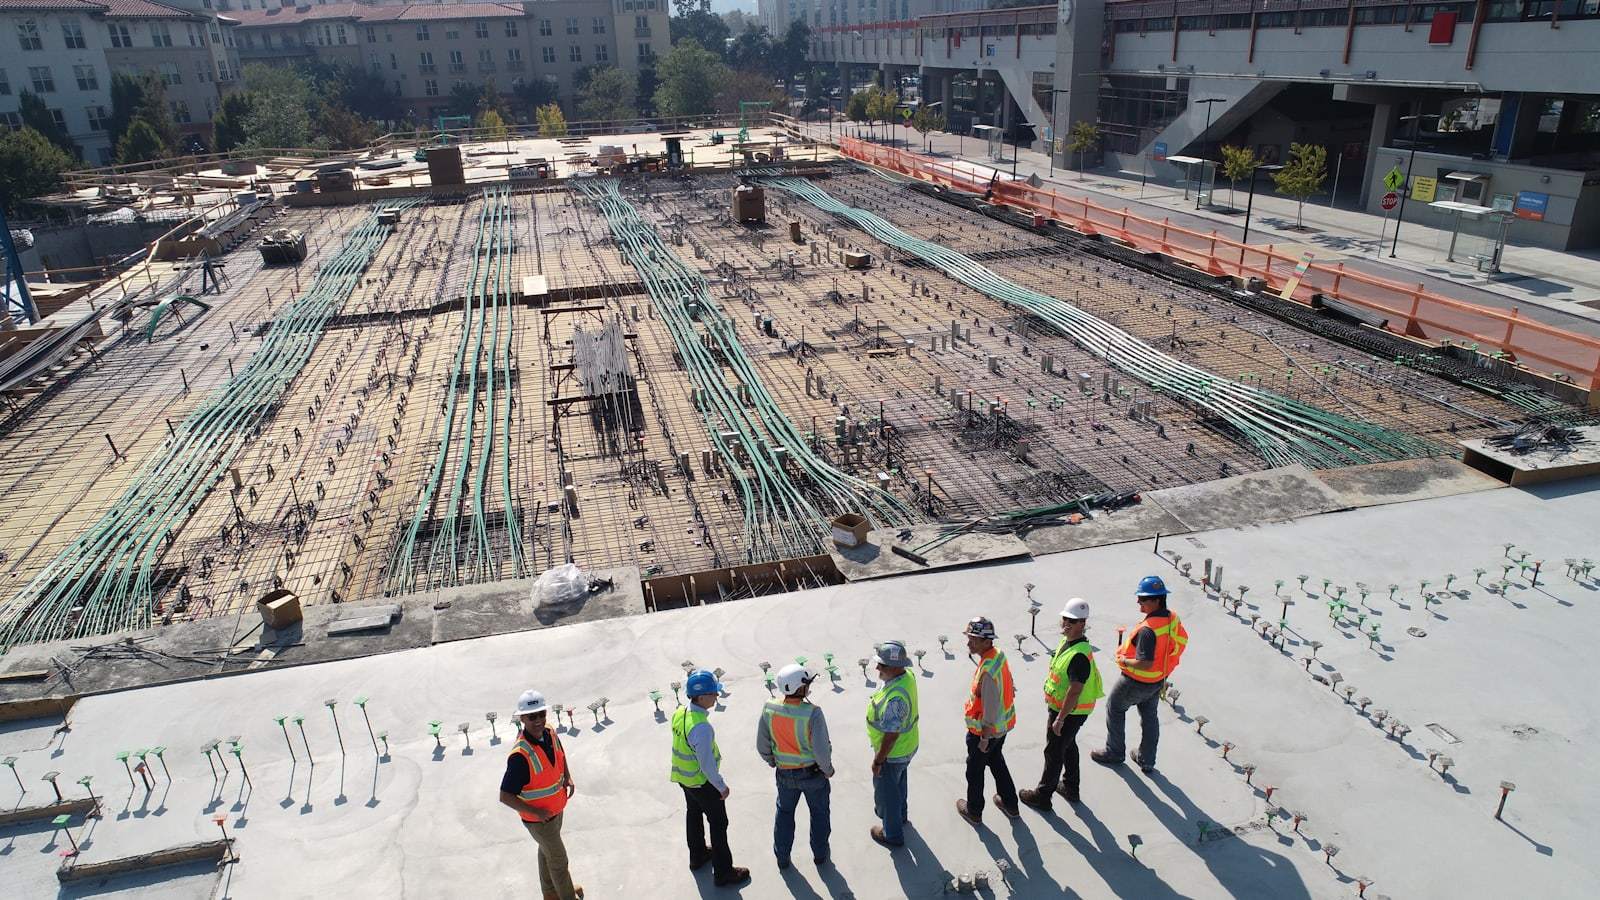
Seven workers in hard hats and hi-vis vests standing in a line on a poured concrete deck, with a large rebar and post-tension cable mat laid out behind them.
Step 03

Start dispatching

Write the first quote, put the approved job on the calendar, and send it to a crew. The rest of the system fills in behind that one job.

The walkthrough

One job, in the order it actually happens

Follow a single job from the estimate you type to the money in the account. Nothing in this sequence is re-entered anywhere.

1 · Quote

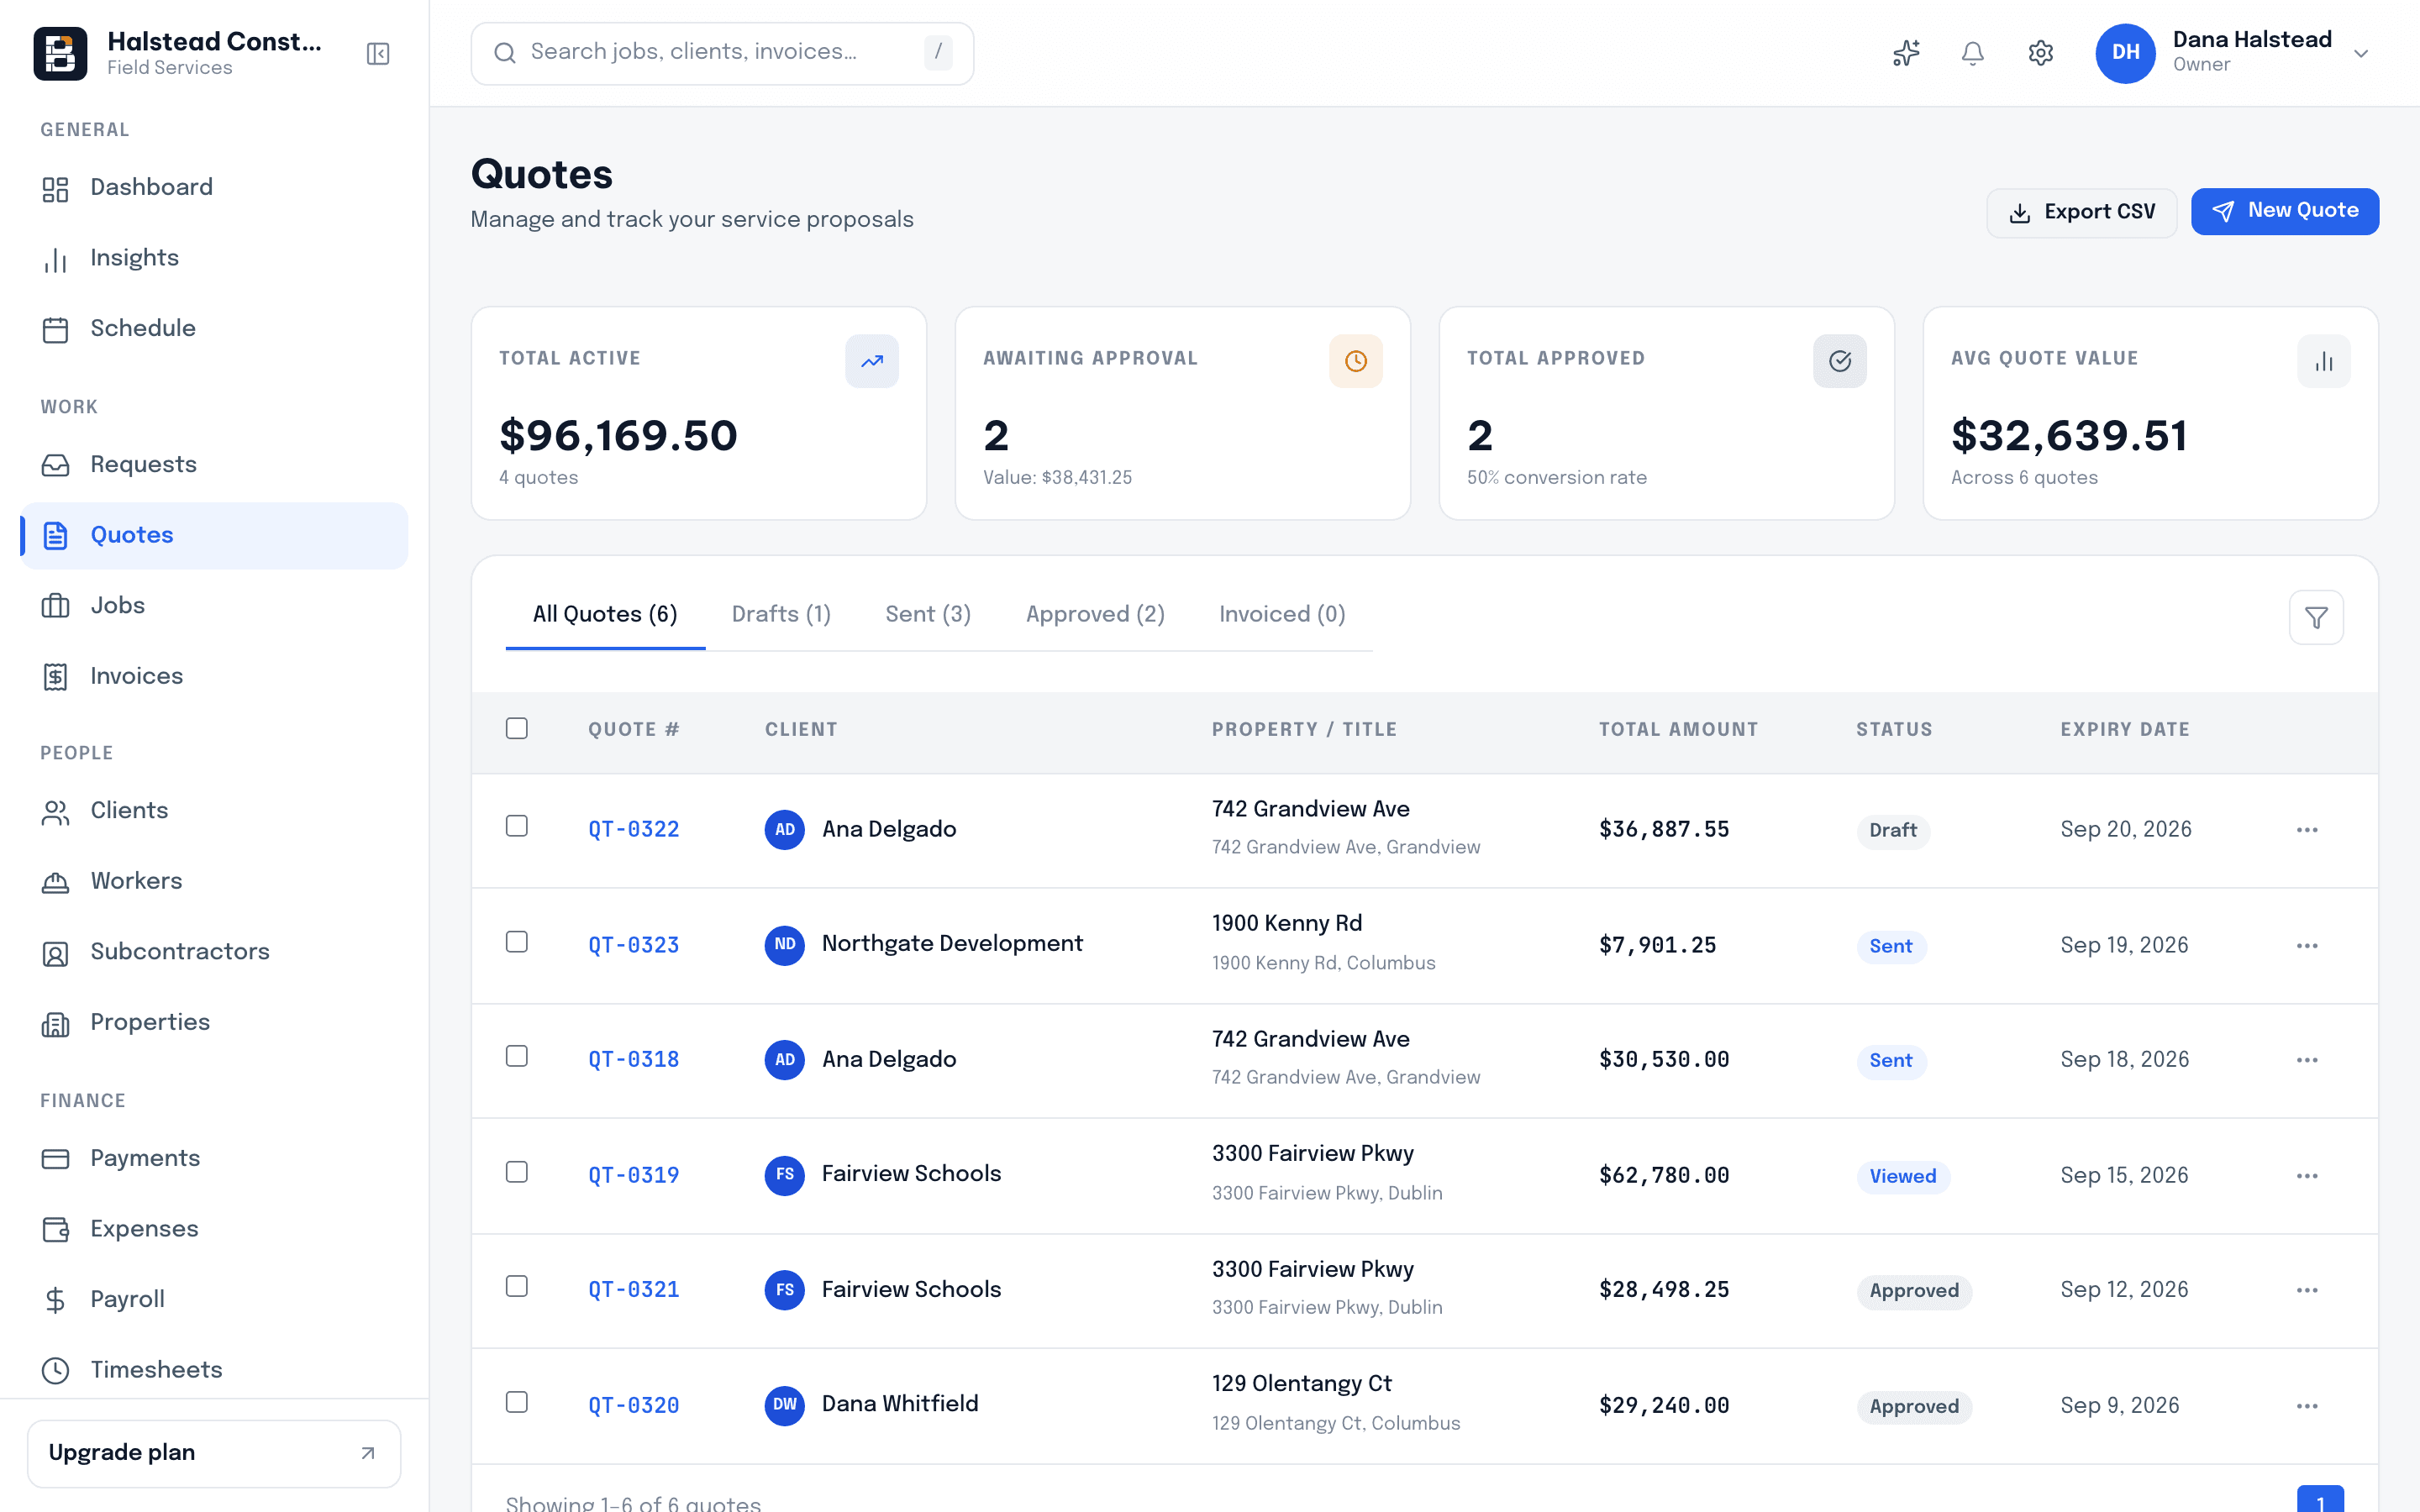
Price the work in line items

Build the estimate the way you would write it on paper — labour, materials, the optional extra the customer asked about — and the totals maintain themselves. Save it once and it is ready to send.

  • Line items with quantity, rate and totals
  • Optional add-ons the customer can accept or skip
  • Your company branding on the document
  • Saved against the client, not in a folder on a laptop
The Bricklark owner dashboard showing the quotes list with statuses and totals.
2 · Approval

The customer approves it from a link

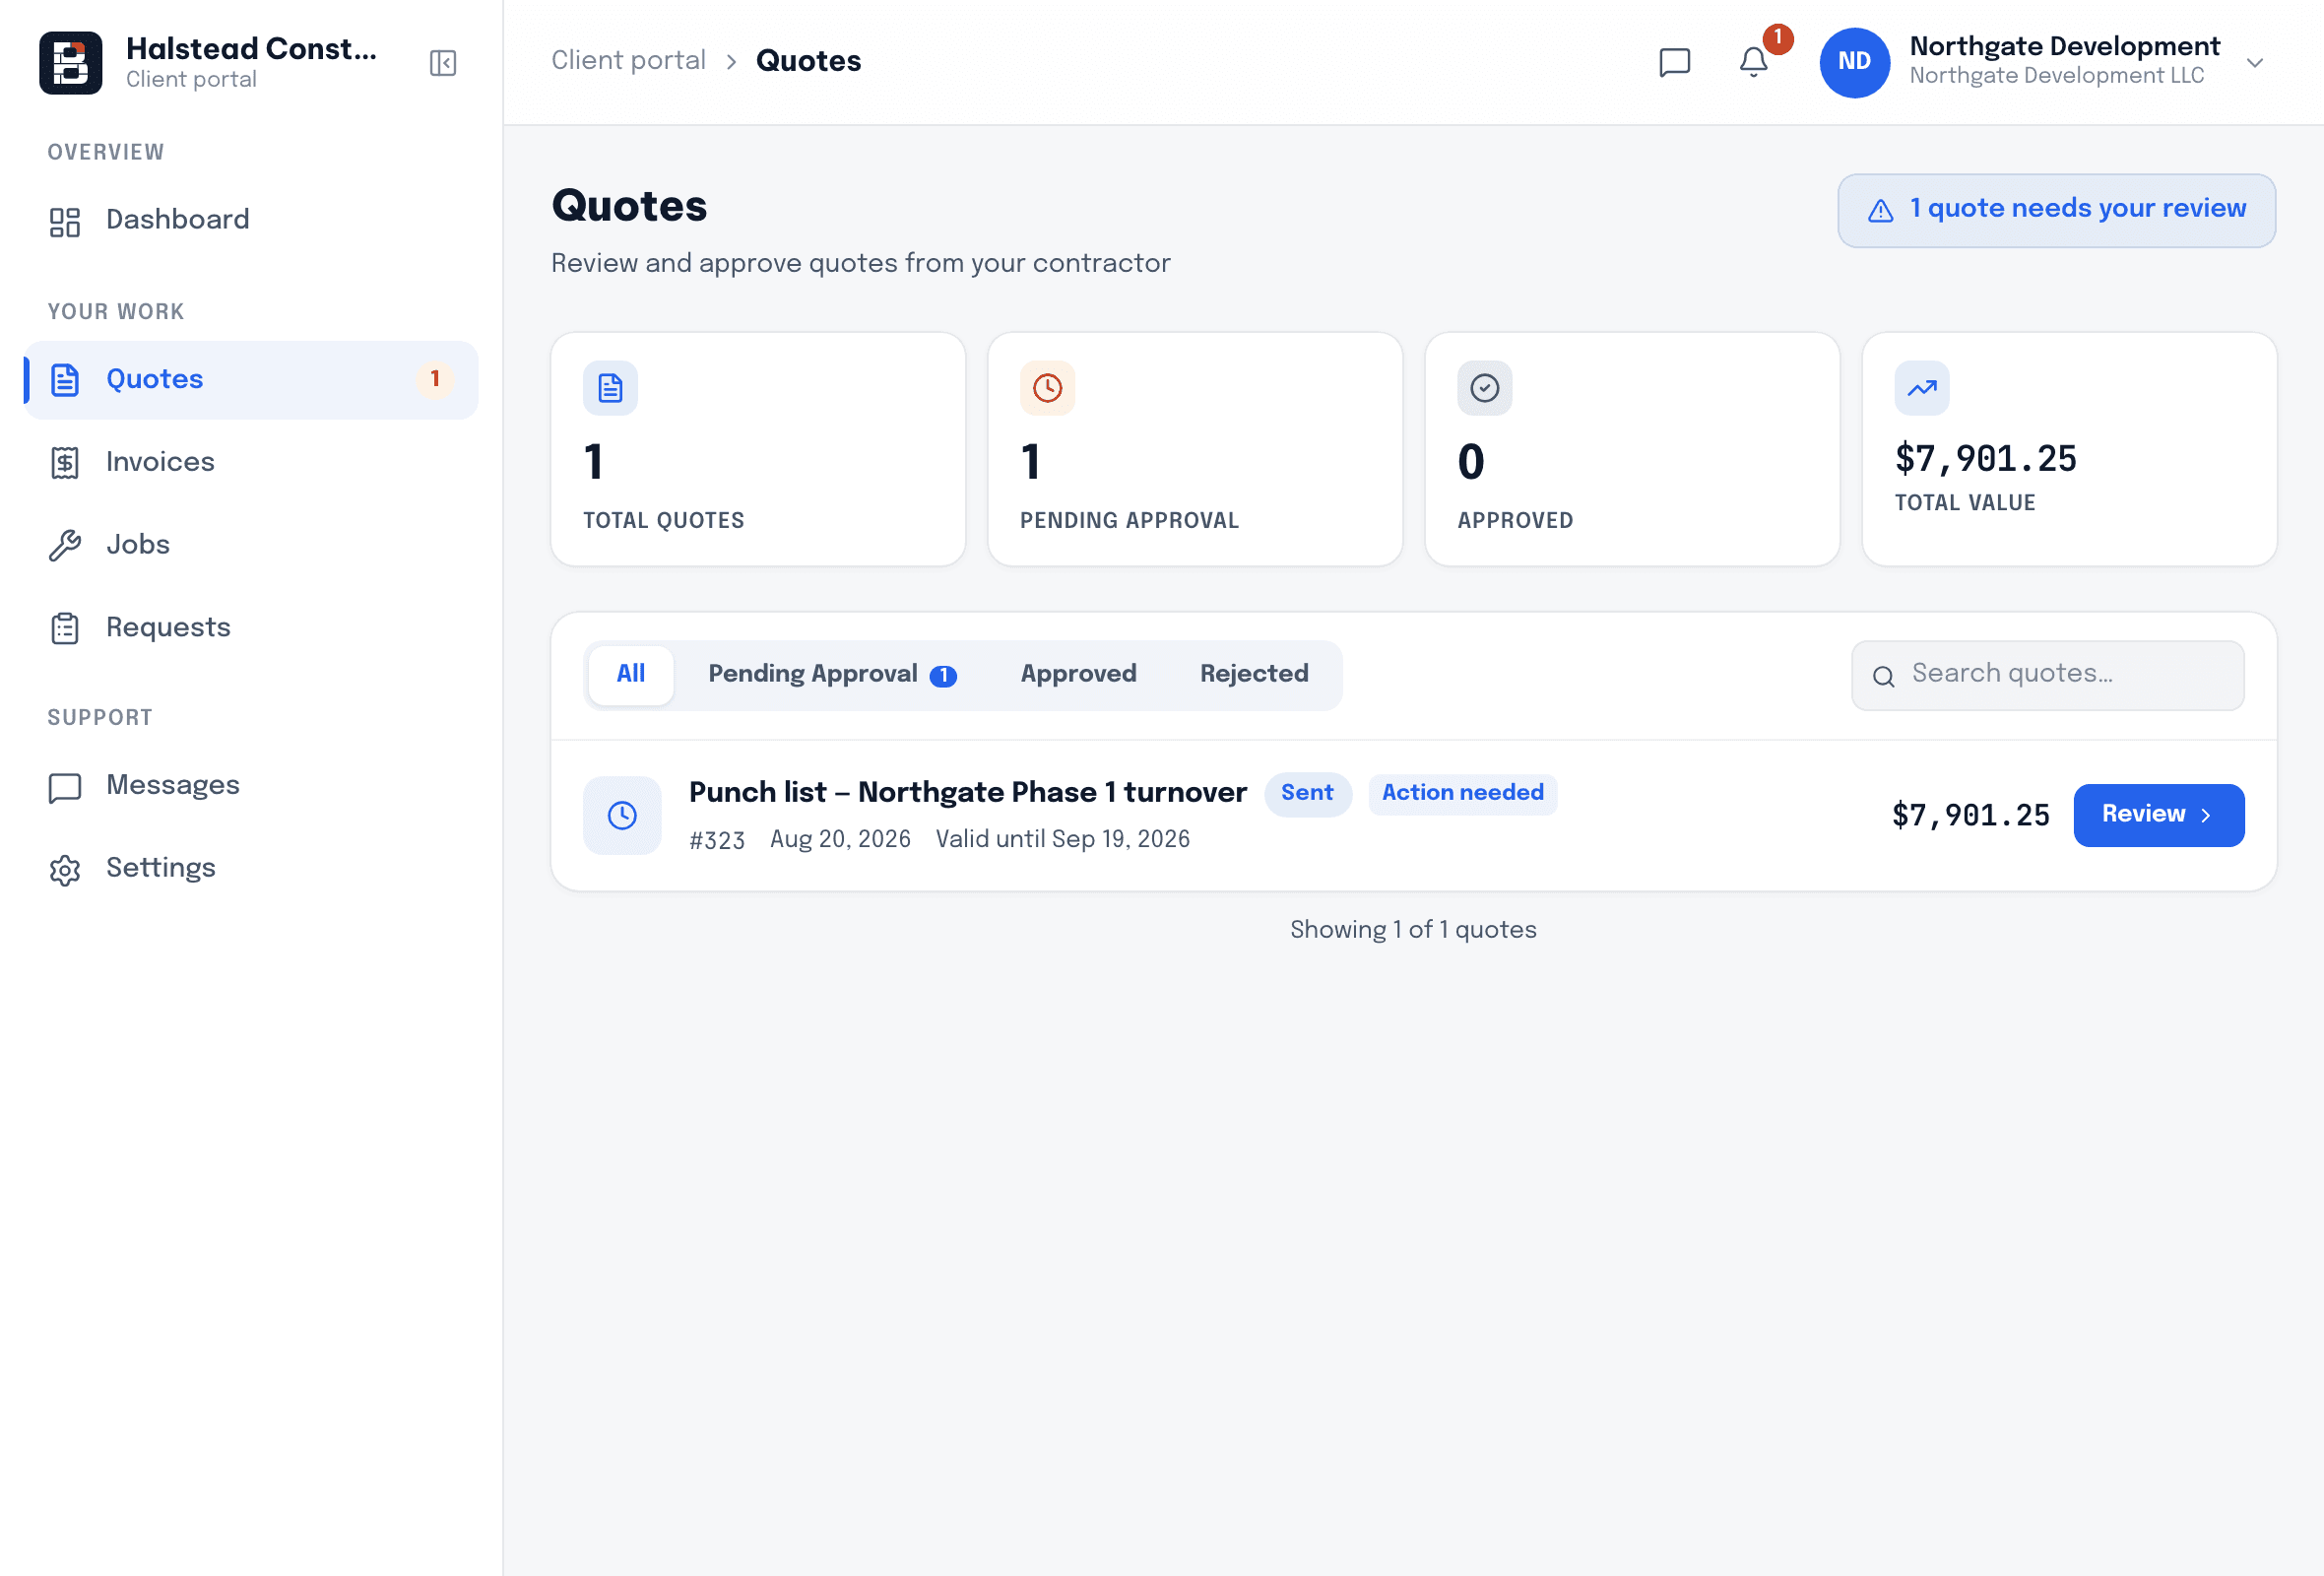
No printing, no scanning, no waiting for a signature to come back by email. The client opens the quote in their portal, reads the line items and approves — and the approval is recorded against the record.

  • Client reads the full breakdown, not just a total
  • Approval timestamped on the quote
  • The approved quote becomes the job
  • Deposits can be collected at approval
The Bricklark client portal showing a quote with its line items and an approve action.
3 · Schedule

Put it on the calendar and assign the crew

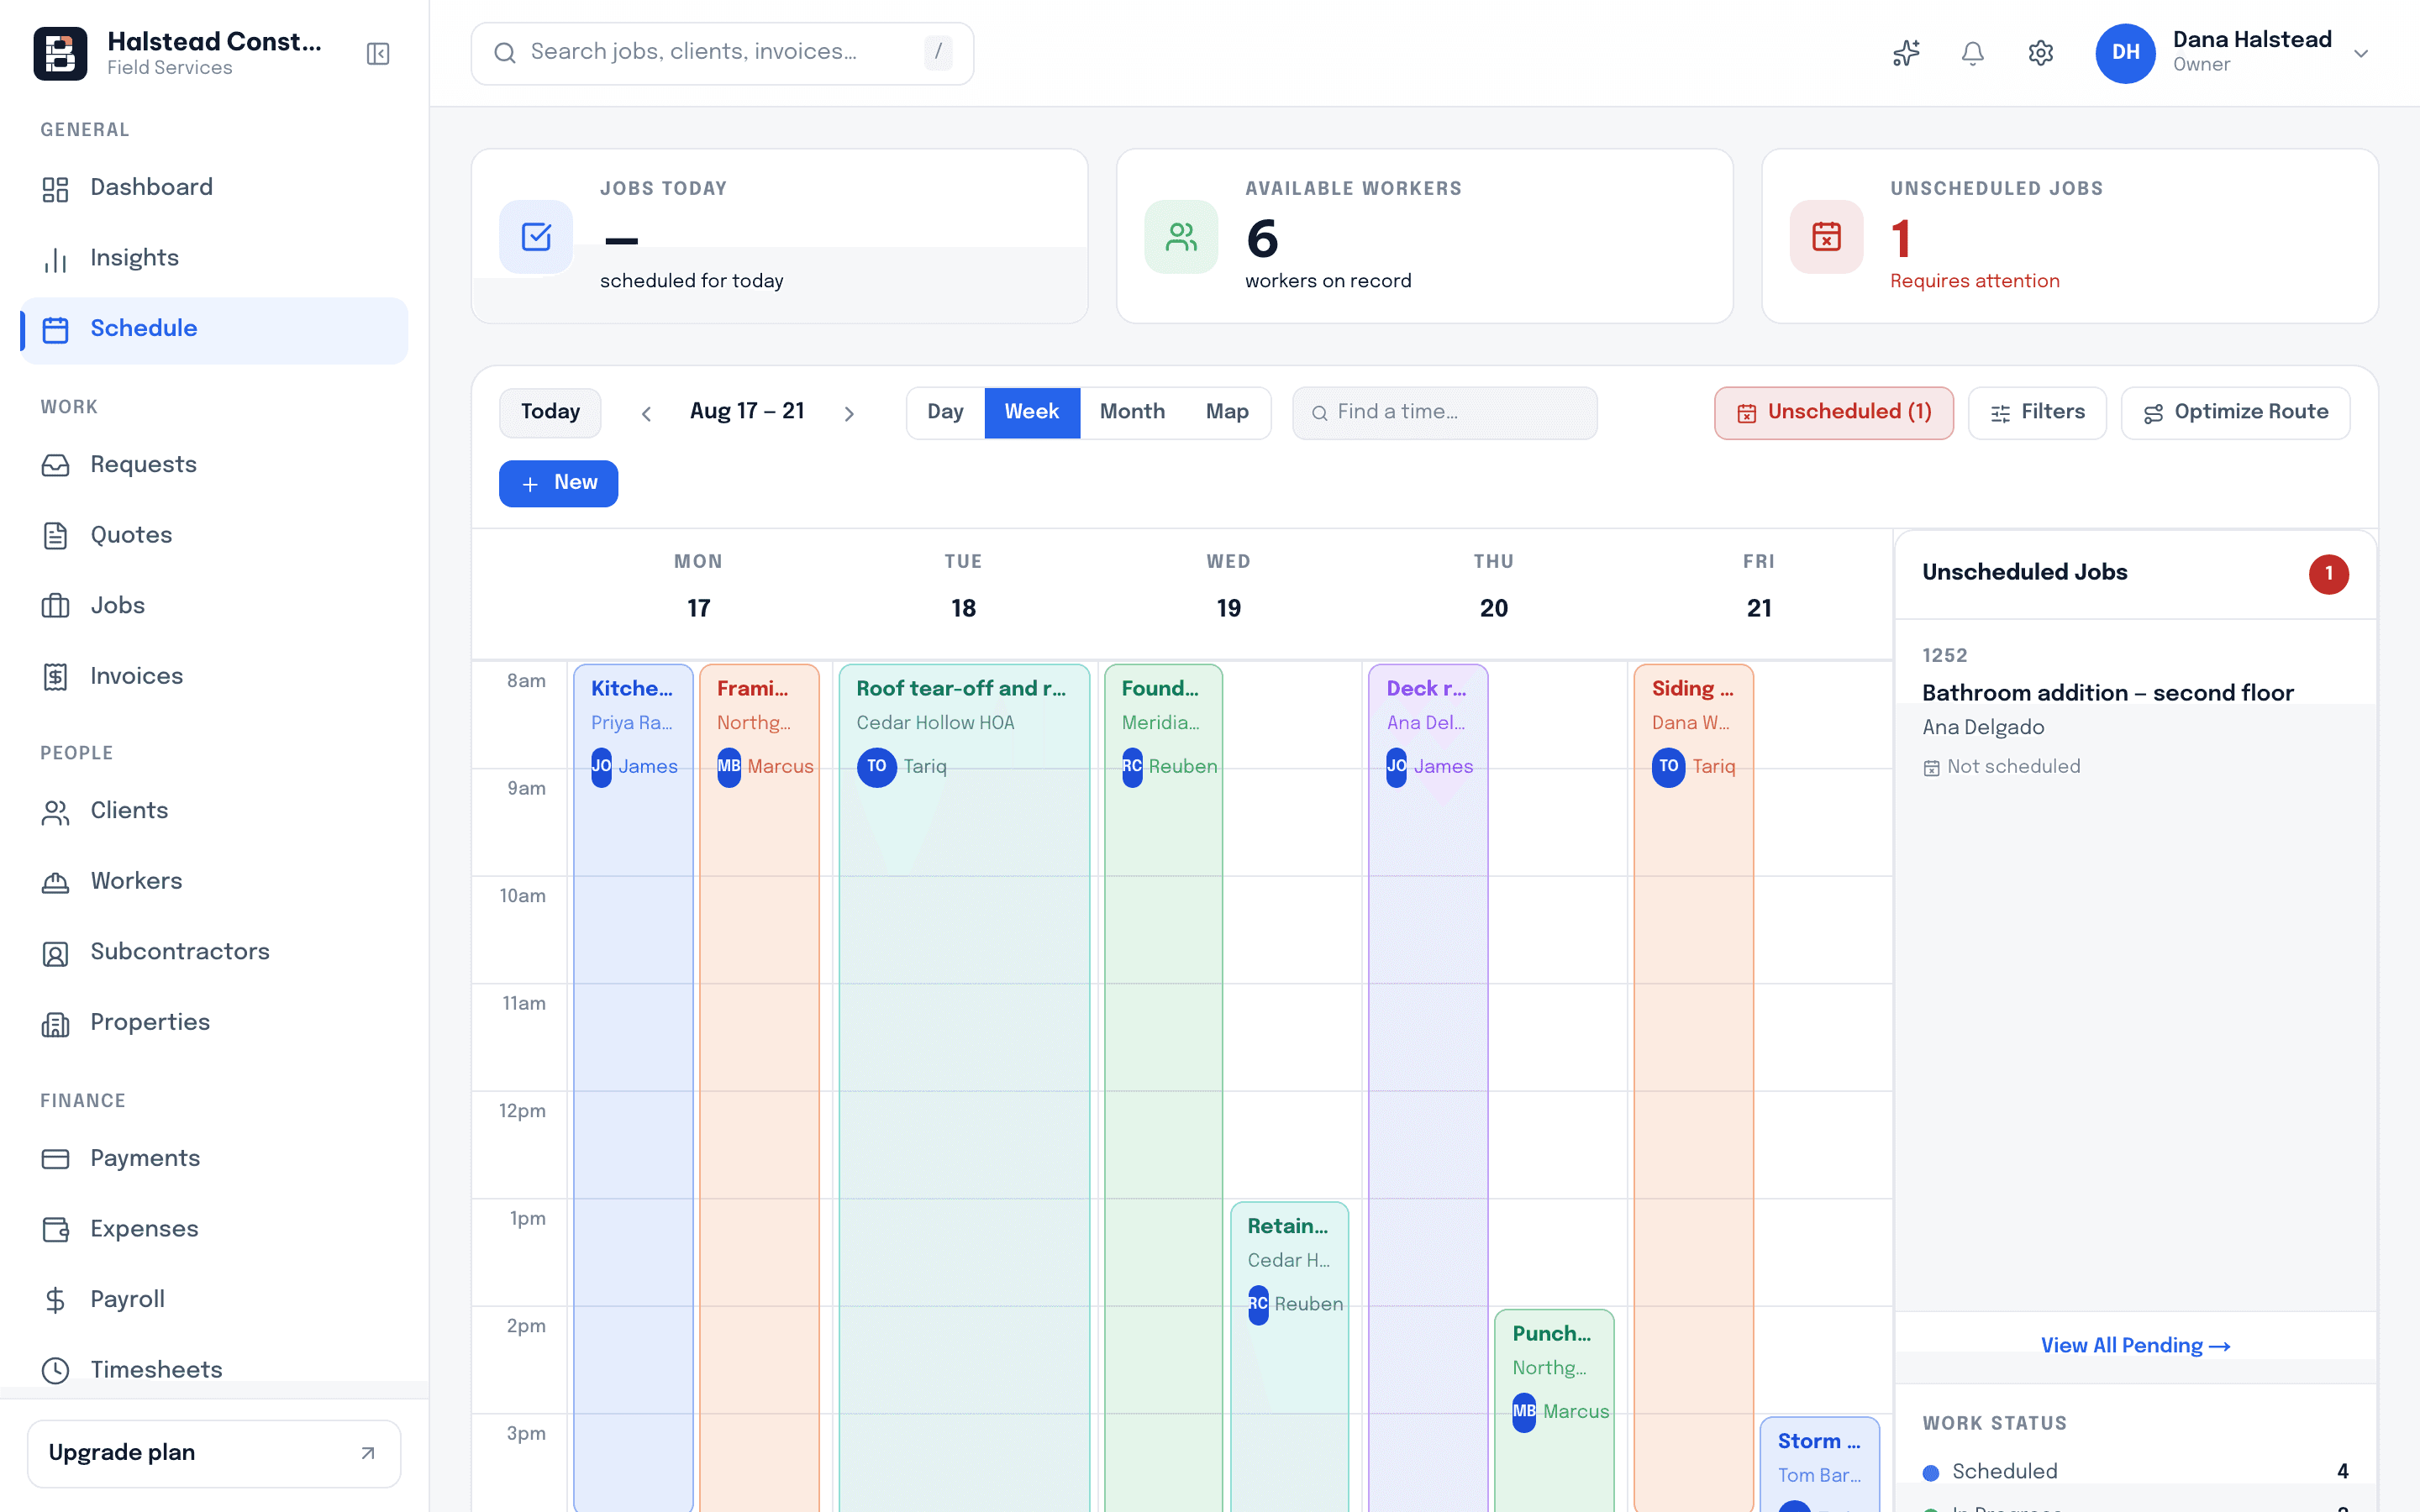
The approved job lands on the same schedule the whole office reads. Assign the worker or crew, set the day, and if the weather moves it, move the job — everything downstream follows the change.

  • Day, week and month views of every visit
  • Assign by worker or by crew
  • Reschedule by moving the job once
  • Crew app reflects the change immediately
The Bricklark schedule showing jobs laid out across a calendar week with assigned crew.
4 · The crew

On site, it is one screen

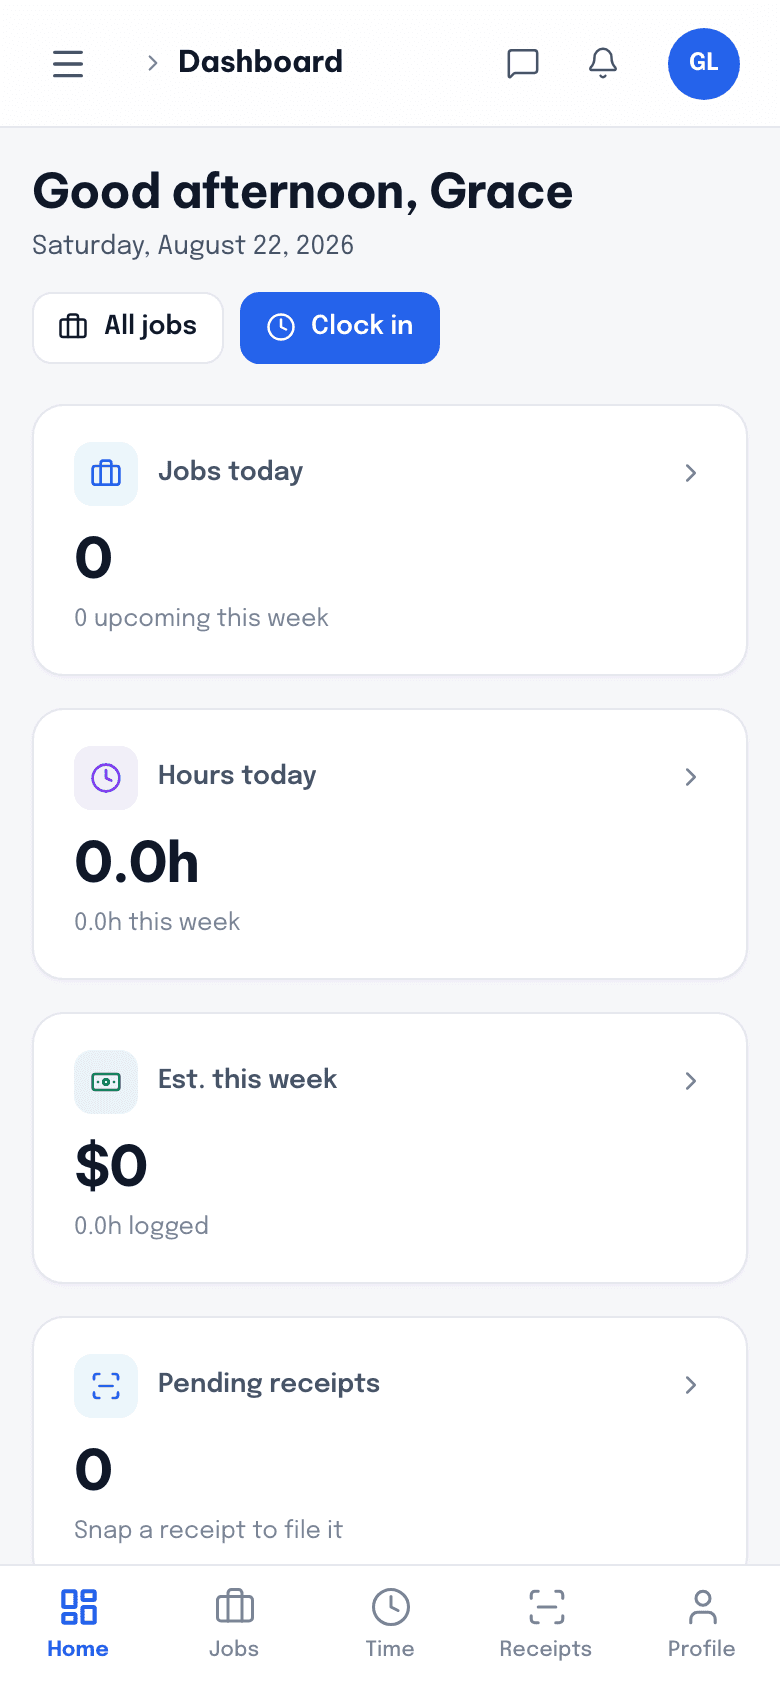
Workers do not get a dashboard. They get today's visits, a clock, a camera and a notes field — because that is all anybody wants to operate while standing on a roof.

The Bricklark crew app today view listing the visits assigned to one worker.
The Bricklark crew app job list showing each assigned job with its address and status.
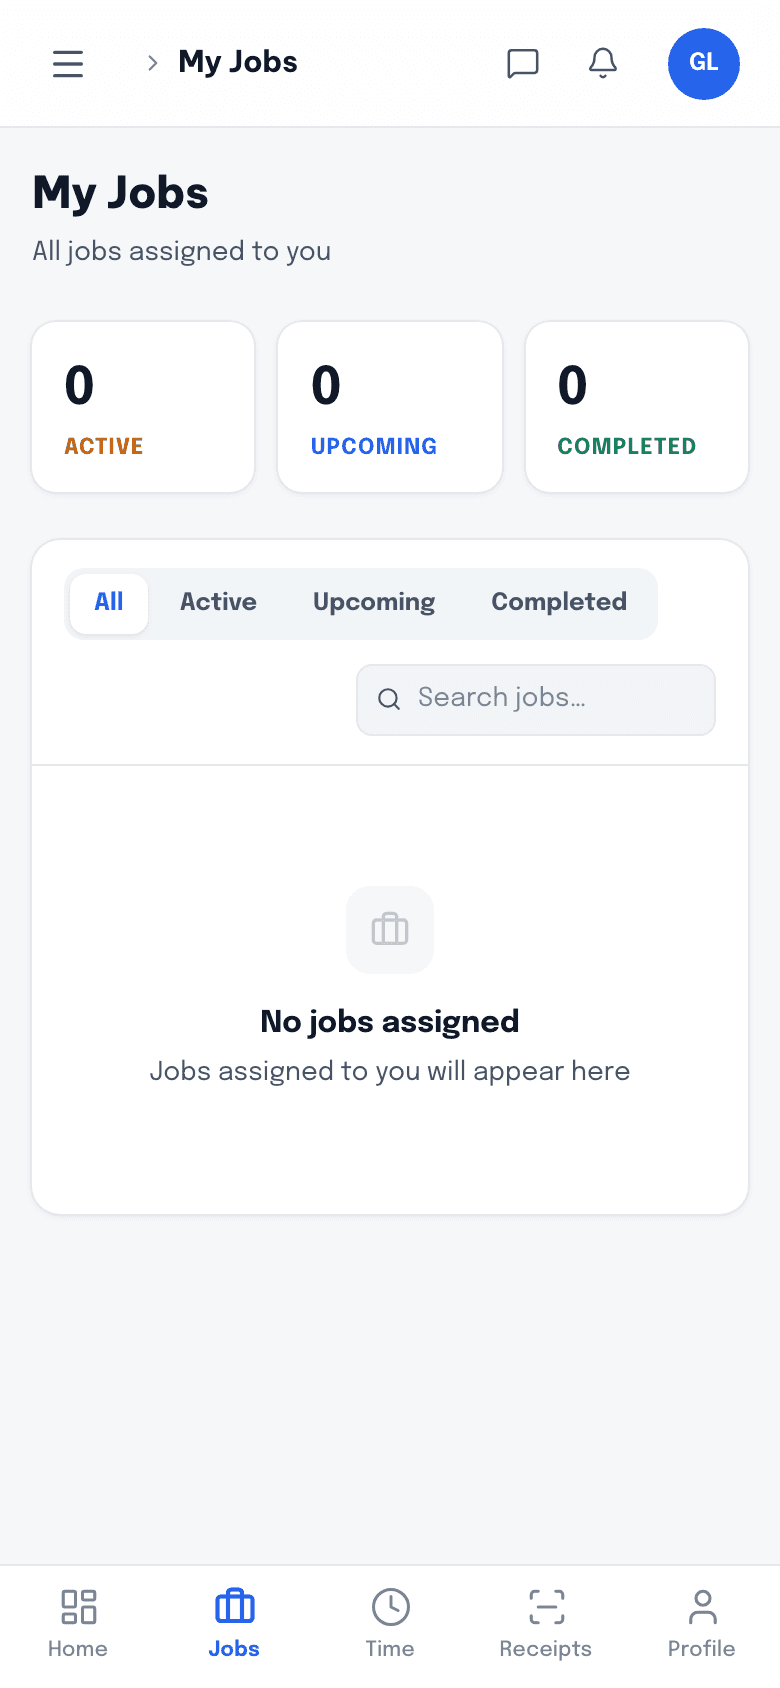
The Bricklark client portal on a phone showing the customer their job and invoice.

Crew today view, crew job list, and the same job as the customer sees it. Photos, notes, clock-ins and receipts all upload against the visit that produced them.

Getting paid

The last two steps are the shortest

Everything the invoice needs was agreed on the quote and confirmed by the crew. Billing is a click, and the client pays where they already approved the work.

5 · Invoice

Bill the job without rebuilding it

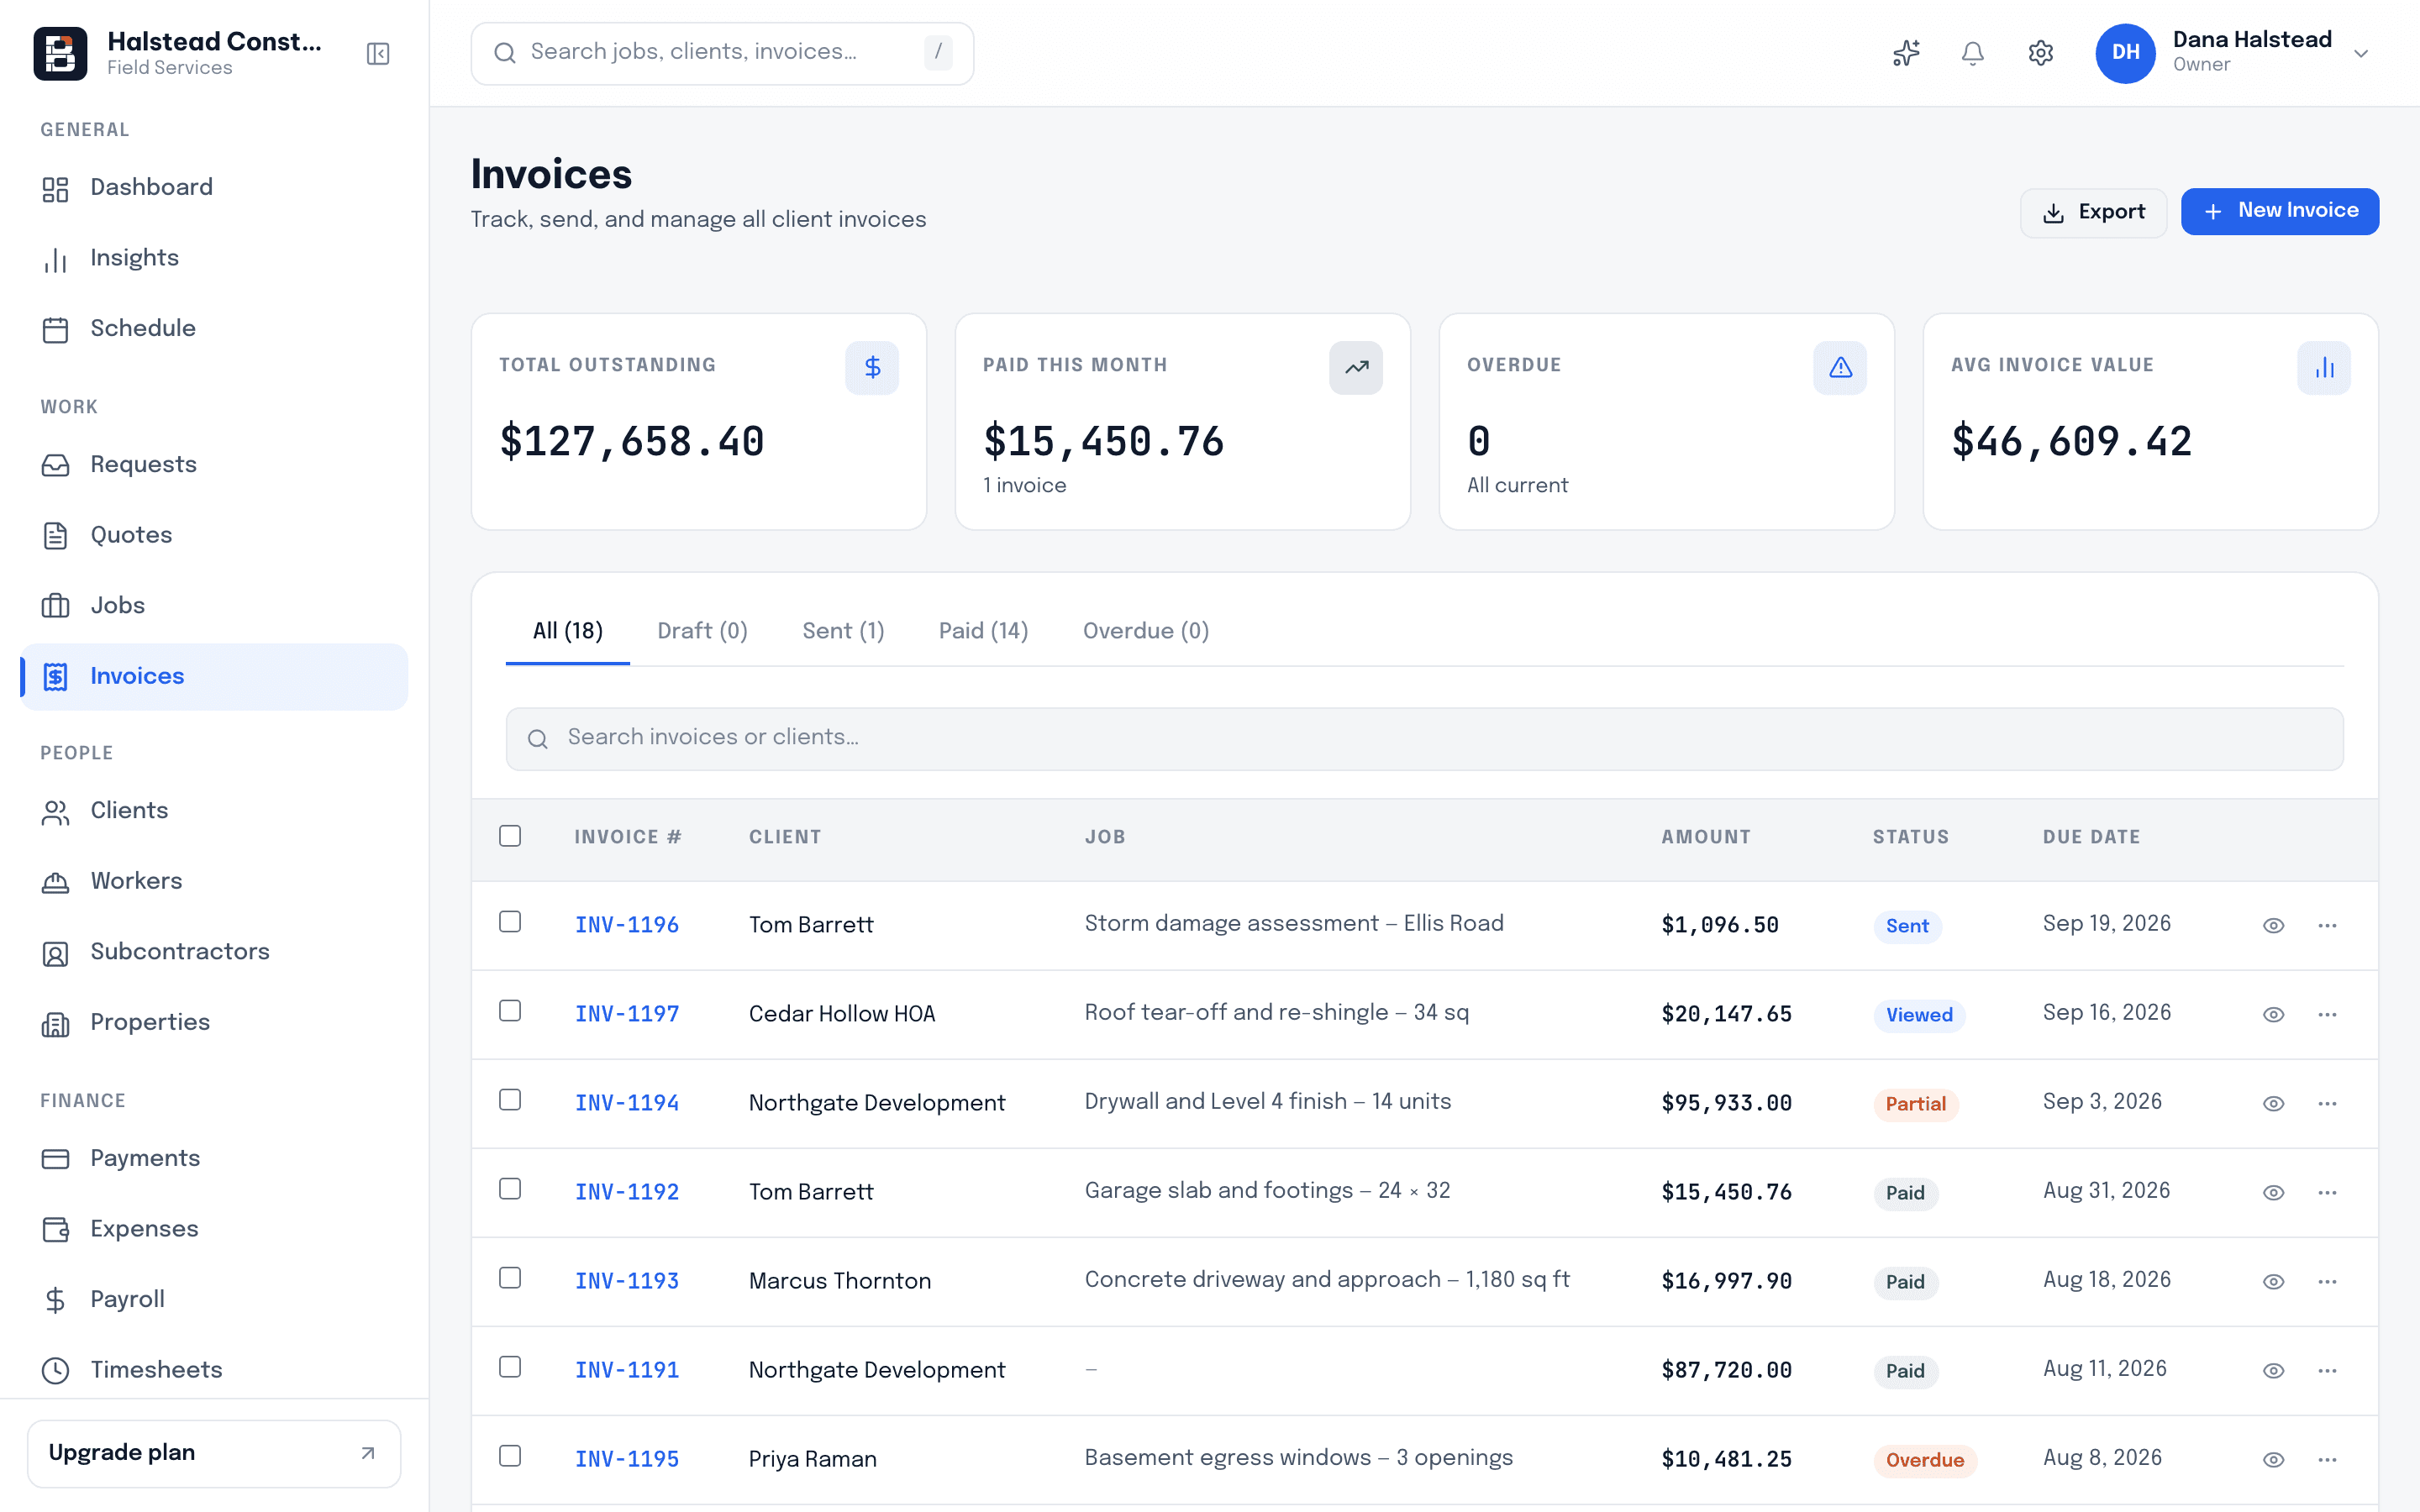
A completed job becomes an invoice carrying the quote's line items, plus anything the crew added on site. The number you send is the number you agreed, and nobody retyped it to get there.

  • Line items carried from the approved quote
  • Materials and expenses added from the field
  • Sent to the client the moment the job closes
  • Deposits already taken are credited against the balance
The Bricklark invoices screen listing invoices with amounts, statuses and due dates.
6 · Paid

The customer pays where they already are

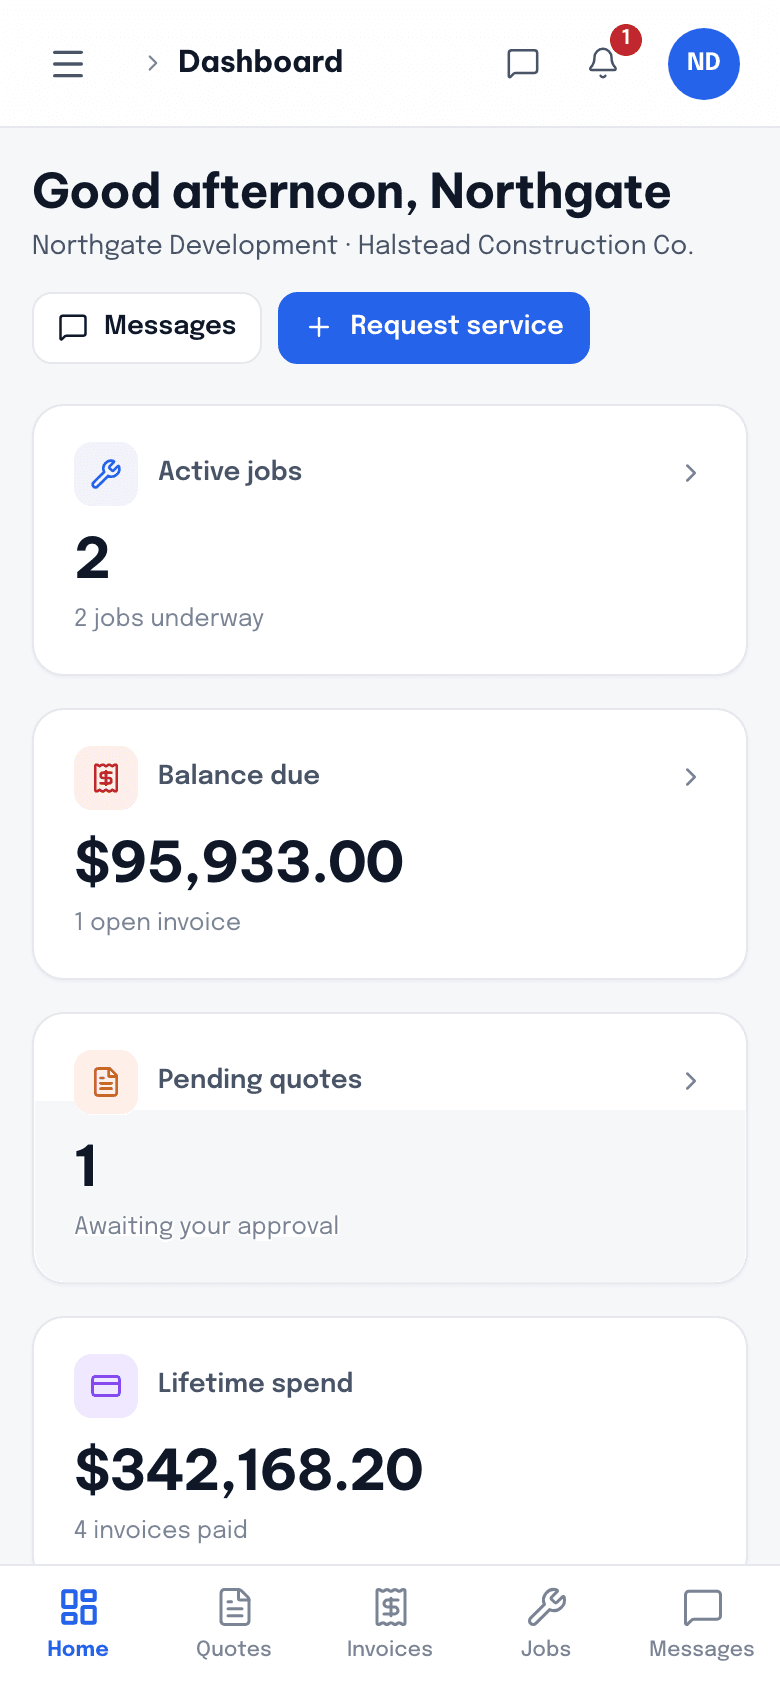
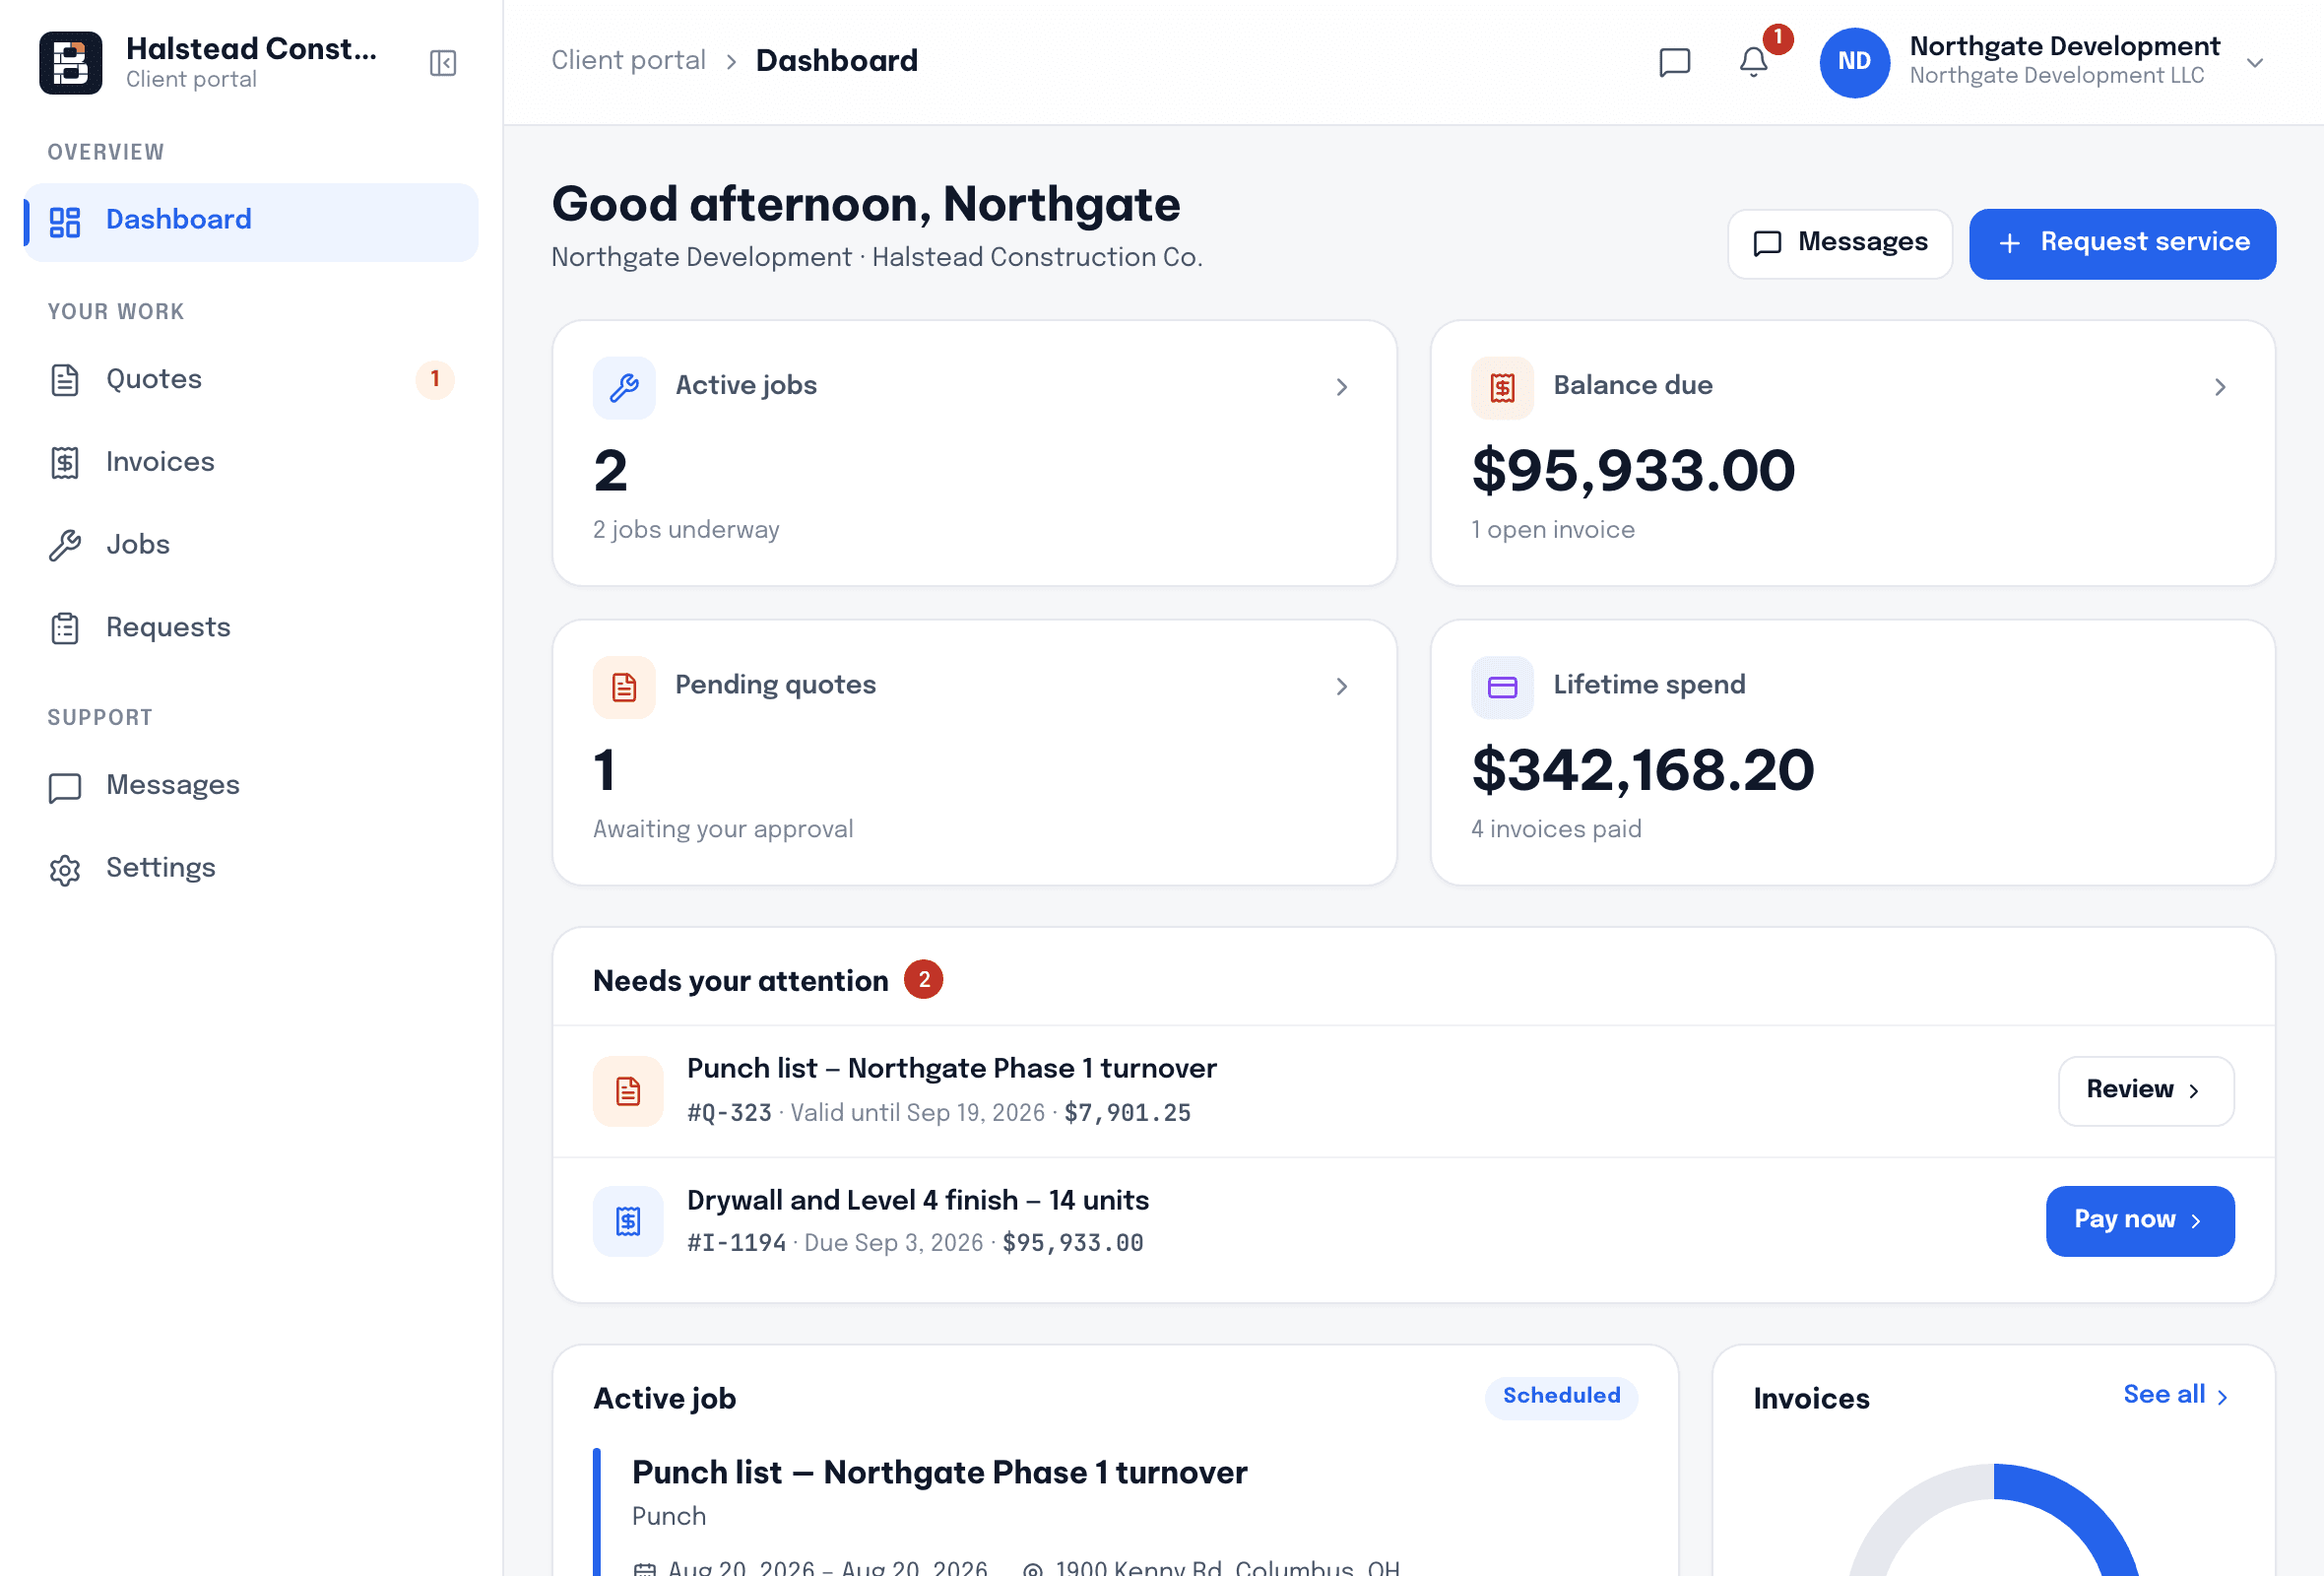
The same portal that carried the quote carries the invoice. The client pays from it, the status updates on the record, and the job closes without a follow-up call from your office.

  • Card payment from the portal
  • Status updates against the invoice
  • Client keeps a record of everything they approved
  • Insights picks the revenue up automatically
The Bricklark client portal home showing the customer their jobs, quotes and invoices.
Week one

What the first week actually looks like

Not a rollout plan. Six small things, one a day, each of which leaves you better off even if you stopped there.

Day one — set the shop up

Company details, logo on the paperwork, and the handful of clients you have live work with right now.

  • Branding on quotes and invoices
  • Add active clients and properties
  • Invite the office

Day two — send a real quote

Build one quote with real line items and send it to a real customer. Everything downstream is shaped by that document.

  • Line items and totals
  • Client approves from a link
  • Approved quote becomes the job

Day three — put the week on the calendar

Move the jobs you already had on a whiteboard onto the schedule and assign the crew that is doing them.

  • Assign by worker or crew
  • Reschedule by moving the job
  • Crew see it immediately

Day four — get the crew on their phones

Walk one worker through the today view. Once one crew member clocks in from the app, the rest follow without a meeting.

  • Clock in and out on site
  • Photos and notes on the visit
  • Receipts from the truck

Day five — bill it and get paid

Close a completed job into an invoice, send it, and watch the payment land against the same record.

  • Invoice carries the quote lines
  • Client pays from the portal
  • Status updates on payment

End of week — check the numbers

Insights reads from the jobs you ran this week, not from a spreadsheet somebody remembered to update.

  • Revenue and job counts
  • Hours by worker
  • Export reports to CSV

6

Steps from estimate to money in the account

3

Surfaces: office dashboard, crew app, client portal

1

Place a line item is ever typed

0

Implementation calls required to start

These describe the shape of the product, not customer averages.

Questions

What contractors ask before signing up

Creating the account and getting your branding on a quote is a single sitting. The honest answer for the whole business is a week: one live quote on day one, the schedule moved across mid-week, and the crew on their phones by the end of it. Nothing here needs an implementation project.

Run one job through it

Quote, schedule, dispatch, invoice, paid. One job is enough to tell whether this fits how you work.